aCloud
Introduction
In this project I created SMB server at home, so I can store files in the server, and access them from any computer (that is connected to home wifi). Additionally, I created different users, each of which has access to his own folder. This page is an overview of the hardware that was used in this project. There are also SSH and Samba pages where I explain how to configure secure connection via SSH, enable SMB server using samba, and manage users.
Hardware
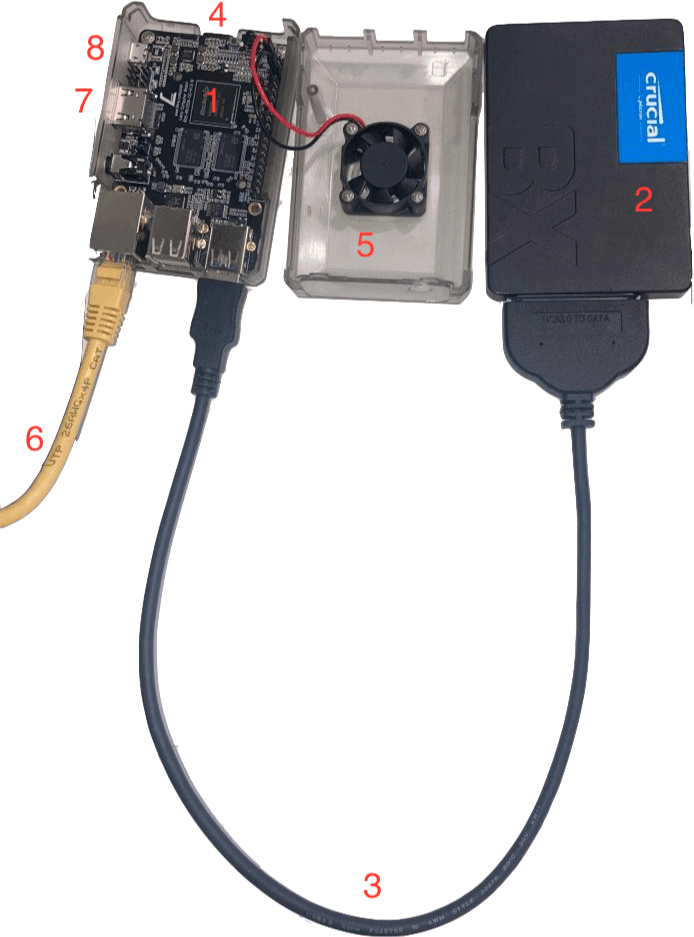
While working on the idea, I planned on using Raspberry Pi 4 with 8GB RAM. However, this board was not available because of supply chain crisis (2022). So I searched for another board that is similar, and found one with NVMe port, so theoretically is faster than USB 3.0. Unfortunatley, this board was also not available, so I kept searching until I found ROC-RK3328-CC (Renegade). This board has 4GM RAM and a USB 3.0 port, so performace was compromised. Here is a list of all hardware components for that project:
-
ROC-RK3328-CC (Renegade) - SBC board with 4GB RAM, USB3.0, HDMI, microSD card slot, etc.
-
1TB 2.5-inch SSD with SATA connection
-
SATA to USB3.0 cable
-
MicroSD card (64GB)
-
RPi case with a cooling fan (optional)
-
Ethernet connection
-
HDMI (only required for the installation)
-
MicroUSB (power source)
Flashing OS on SD Card
At first I installed Ubuntu 22.04 because I thought it is more stable than Raspbian, but this was a mistake. Ubuntu was very slow, and it never gotten any faster. Also, there were many bugs, such as USB port doesn't work, and a black screen when using GNOME to share screen. Then I deleted Ubuntu and installed Raspbian, and I was surprised by how faster it is than Ubuntu. To flash OS on an SD card, you need to download the OS Image and you can either use terminal (dd command), or a program to flash image on the SD card. I recommend using balenaEtcher, very easy and quick.
Server Installation
-
SSH - Once the OS image is installed on the SD Card, you can connect it to the board. A keyboard, a mouse, Ethernet and HDMI connections are also required until SSH is configured. Then, turn on the board using microUSB port and installation process should appear on the connected screen. Once completed, I recommend enabling and configuring SSH to enable remote connection, so the HDMI, keyboard and mouse are no longer required. To make it more secured, I recommend configuring SSH to keys only, so access with password will be denied. More details in SSH page.
-
Format Disk - 1TB of storage was utilized in this project, but in order to allow various users to access different directories, the disk must be formatted as ext4 (could also be nfts, but didn't test it) for compatability with Linux (Raspbian is based on Linux). At first, the disk was formatted as ExFAT on my mac because it was an easy process, but it was a mistake. In this case, read and write could done by only one user. Trying to change ownership (chown command) and change permissions (chmod command) didn't work at all. ExFAT is compatible with Windows, and therefore Linux cannot change either ownership or permissions. For that purpose, I used gparted which is a program to manage partitions. Another option is to use terminal, but gparted has a great GUI (Graphic User Interface), so it is easier to avoid critical mistakes.
-
Samba - Samba is a free tool that provides file and print sharing services. There could be many users with access to different folders within the shared disk. The users access the server with their username and password which are, currently, generated by the root user through an SSH connection. Samba was also configured to send an email for both connecting to and disconnecting from the server. More on that in the Samba page.
-
Sharing Screen (Optional) - This step is not necessary since almost everything can be done through SSH. However, it might be more convenient to be able to control the server from another computer by sharing the screen. While looking for services, I noticed that Raspbian uses a tool that is subscription based. So I searched for a free tool and found DWS and is very easy to use. Simply downloaded Raspberry version (.sh file) and copied it to the server. To share screen, the file must be executed on terminal which will create a session and generate temporary username and password. On local machine, go to dws and enter username and password to gain full control. To prevent access from hackers, the .sh file was encrypted with password using GnuPG.
Accessing Server
-
SSH -
ssh user@IP_Address -
Samba - To start the server, on terminal run the following:
sudo service smbd startThis will enable a new connection under Network (on Mac). It will ask for username and password, so directories will be accessible based on the user that logged in.
Performance
Read and write speeds in the server are around 340MB/s and 80MB/s respectivley as shown in the images below:

These test results follows the expected values of read/write speeds of USB3.0. However, the same test should be done on another machine connected to the Samba server in order to evaluate speed over the internet.

As can be seen in the images above, performance is worse than the one performed on the server itself. Over the internet, read speed is 11,587,146 bytes/second which is ~11 MB/s, and write speed 10,101,961 bytes/second which is ~9.6 MB/s. This test shows that both writing to and reading from this server don't max out the read and write speeds of USB3.0. With that in mind, choosing NVMe over USB3.0 would probably not affect this test much. Instead, better network speeds, as well as greater RAM will probably increase performance.
Summary
Server is up and running, email notifications for both SSH and Samba are working well, so I get notified in real-time. The goal of the project was achieved, as I wrote those lines by connecting to the Samba server remotley.Read and write speeds are slower than those evaluated on the server, but it is good enough since I am using it for files that are small in size such as Python projects, or storing pdf documents.